Westside Barbell founder Louie Simmons was an avid writer for people who wanted to learn about practical strength training. He based his information on practical experience with his athletes (Over 1500 powerlifters, athletes, and coaches trained in person at his gym). After ten years of experimentation, he published his first strength training article in a print magazine called Powerlifting USA and later moved from print to digital media and made his articles and blogs available online for all to read. Louie's content has been and still is a vital resource for many looking to expand their knowledge. Westside Barbells' role as a strength-education company is to ensure that this legacy of information stays relevant and available to all. I aim to build on current articles, where needed, with unpublished data from Louie's archive and any new developments made within the gym, our network of coaches and athletes, or the strength sciences. This article and blog update will allow me to simplify or build upon topics asked by our community. The goal is to further enable all visitors and followers on their strength training journey by providing more insight into the genius of Louie Simmons and our strength training methods.
- Tom
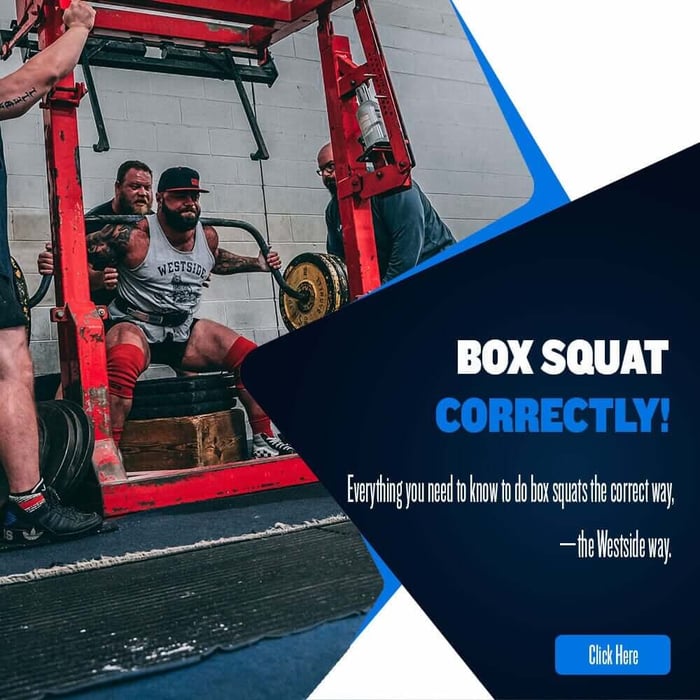
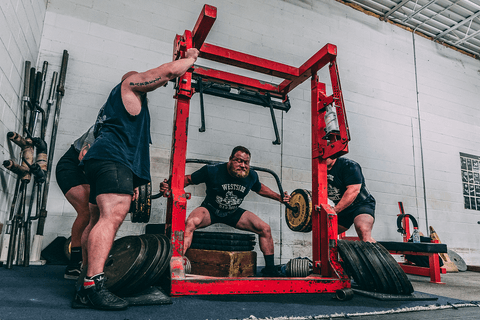
How To Do a Box Squat Properly!
In the last Article, I gave you about a dozen excellent reasons why you should be box-squatting (and hopefully cleared up any misconceptions you may have heard about box-squatting).
I also told you that every member of Westside Barbell does box squats year-round (with free squats done only in competition), including the 19 Westside lifters who can squat more than 1,000 pounds. Convinced?
You don’t see box squats commonly performed in the gym because the majority of even the most experienced lifters don’t know how to do a box squat correctly.
I will now tell you everything you need to know to do box squats the correct way—the Westside way
-Louie Simmons

BOX-SQUATTING TECHNIQUE
THE WESTSIDE WAY
I will first teach you Westside box-squatting technique and then some fundamental Westside box-squatting methods, so you know how to incorporate box squats into your strength-training program.
Anyone can sit down on a box and stand back up, but you have to apply science to the specific execution of the lift. You must learn the systematic procedure to correctly execute the mechanics of the box squat and also become proficient and in command of its execution. After all, if you don’t plan on doing something perfectly, why do it at all?
Let’s begin.
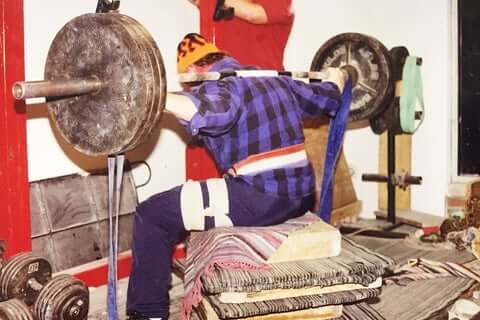
CORRECTLY POSITION YOURSELF FOR THE BOX SQUAT
1) Set your stance. You should set your stance as wide as possible, with your knees pushed out to the sides and your feet pointing straight ahead or slightly outward. Using a wide stance when squatting will place greater stress on the posterior chain (glutes, hips, hamstrings, and back) where it belongs, not on the quads (it’s a common misconception that the quads are the most important for squatting maximal weights).
2) Set yourself to the bar. Get under the bar, push your neck into your traps, and position the bar in the groove of the upper back (not above the traps). Pulling your shoulder blades together may help you maintain the proper position of the bar. With a wide-hand monkey grip on the bar, pull the bar tightly into your traps, while pulling your elbows up and under to engage the lats (do not flare your elbows out).
3) Set your core. Now that your upper back is tight and you are positioned for the lift, you’ll need to tighten your midsection. Expand your abdomen (not your chest) by taking a deep breath through the diaphragm, pulling as much air as possible into your abdomen by pushing your belly into your lifting belt. In order for the power from your lower body to be maximally transferred to the bar, your abdominal muscles must be tight throughout the entire lift.
This will also stabilize and support the lower back. If your core isn’t tight, there will be an unnecessary dissipation of kinetic energy through the core, in addition to the inherent loss of kinetic energy resulting from the collision that occurs when you sit down on the box. This will translate to an overall reduction in kinetic energy and stored stretch reflex that contributes to your ability to explode off the box as you initiate the concentric phase of the lift.
4) Lift the bar from the rack. With the core as tight as possible, lift the bar out of the rack by arching your upper back, lifting your chest up as you drive your head back, then pushing the bar up evenly with your legs. To box squat correctly, you should also be forcing your knees out to the sides and pushing out on the sides of your shoes, never downward, as though you are trying to spread the floor apart. This is to further activate the hips. You are now ready to descend into the eccentric phase of the lift.
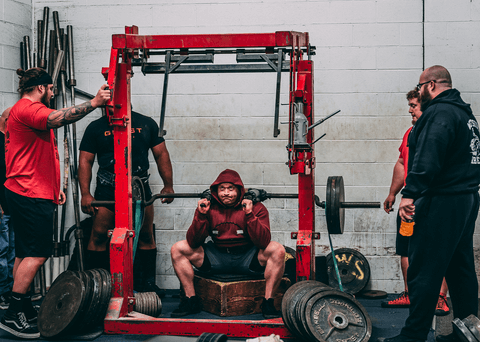
THE ECCENTRIC PHASE
DESCENDING ONTO THE BOX
The eccentric phase begins by breaking the hips first, not the knees. You do this by pushing the glutes and hips rearward (then follow with the head) as you push your feet and knees out, thus forcing you to sit back (not down, or your quads will dominate). This is the only way to activate your hips and glutes to their full potential, to ensure maximum involvement of the posterior chain.
By sitting back, rather than down, you place the glutes and hamstrings in a highly desirable stretched position. While descending to the box, continue to keep your head and chest high, maintain a tightly arched back, and be sure your core is as tight as possible by keeping your abs pushed out until you are sitting on the box.
THE STATIC/RELAXED PHASE
BREAKING THE ECCENTRIC-CONCENTRIC CHAIN
(SITTING ON THE BOX)
The static/relaxed phase begins when the backs of your legs come in contact with the box and you’re sitting down completely on the box by rolling back onto it. (Note: This does not mean rocking on the box, dropping down on the box, bouncing off the box, or doing a touch-and-go on the box).
You should immediately release (relax) the hip flexors while keeping the rest of your body tight, especially keeping the remaining squatting muscles of the posterior chain very tight during their brief static contraction on the box (this will preserve stored kinetic energy and stretch reflex not dissipated from the collision with the box). You have now broken the eccentric-concentric chain. Your back should remain arched, the hamstrings and glutes stretched, and the abdominals as tight as possible.
The shins should be straight up and down (perpendicular), or even past perpendicular, placing all the work that’s about to happen within a matter of a second or two when you begin the concentric phase of the lift directly on the hamstrings, glutes, hips, and spinal erectors (lower back).
The momentarily relaxed state of your hip flexors and the momentarily static, stretched state other squatting muscles of the posterior chain are about to be overcome by being engaged all in unison in an explosive dynamic contraction in which you leg-curl yourself off the box into the concentric phase of the lift. These static/relaxed-overcome-by-dynamic-work methods are the cornerstone of why box squats are such a powerful lift for the development of absolute and explosive strength. Now it’s time to jump.
THE CONCENTRIC PHASE
ASCENDING FROM THE BOX
After you pause on the box, continuing the correct box squat form begins with the concentric phase of the lift by ascending from the box in an explosive manner in which you simply reverse the sequence of movements in the eccentric phase. This means the head moves first, followed by the glutes and hips. Specifically, begin by being sure your core is tight by pushing your abs out against the belt, then driving the head and upper back into the bar, which engages the spinal erectors and allows you to forcefully flex the hips, glutes, hamstrings, abs, and finally quads while you arch the upper back, drive the feet outward, push straight up into the bar, then jump off the box by leg-curling yourself up.
Now that I have taught you correct Westside box-squatting technique, it’s time to teach you some fundamental Westside box-squatting methods, so you can put your newly acquired skills into practice in your strength-training program.
Benefits of Box Squatting Correctly
Box squats, first and foremost, are one of many squat variations. They are a staple of our training system, but that does not mean we avoid other variations, such as the free, front, and overhead squats.
When taught and executed correctly, box squats can be safer and more effective for athletic development than free squats. Implementing a box will have the following benefits.
It will break up the eccentric/concentric chain.
Sitting on the box causes a collision, which forces you to lose momentum and makes standing back up with the weight more challenging. The loss of momentum occurs because when the glutes meet the box, they dissipate kinetic energy obtained when descending in the squat(eccentric).
Help reinforce technique and posture.
By having a box, you create an environment that allows for more accurate repeatability of a movement. Since depth and stance will be constant, you will quickly feel or see if your technique is off. When free squatting, the ability to compensate to achieve the lift is much higher.
Allow for more predictability in squat depth.
The box height accurately indicates how low you are, ensuring you are constantly hitting the desired depth every time.
It dramatically reduces the force placed on the knees.
The position of the shin angle during a correctly performed box squat reduces the internal pressure on the patellar tendons. The shin angle, accompanied by the correct box height, is a tag team that will save your knees.
It helps increase the opportunity for more muscle utilization.
Using a box allows the opportunity to squat wider than a traditional squat. As a result, the hips, glutes, and hamstrings are more active.
Box squats are great for nearly every training demographic, as they will help to reinforce positive squat technique while building a solid base of muscle development. However, strength training novices should learn how to free squat correctly before making a full or part-time switch to box squatting. This learning period will teach the full range of motion available, give an understanding of the general exercise mechanics, and provide an exercise to compare form and results.
How to Box Squat Correctly Variations
What variations exist, and how do they differ from the typical box squat?
Your imagination only limits many variations of box squats. The most significant difference between a traditional box variation and the others is how the weight loads on the body.
Dumbbell box squat
A dumbbell box squat is an excellent exercise for those looking to add weight to the bodyweight box squat without placing a barbell on their back.
- Stand in front of a box holding a pair of dumbbells with one side of the dumbbell head resting on your shoulder. As you perform this exercise, keep your knuckles pointing to the ceiling and elbows in front of you.
- Start by pushing the hips back to sit back and down on the box. To stand up, press out on the sides of the feet as you squeeze the hamstrings and glutes without letting the chest or elbows drop down.
Kettlebell Box Squat (Double KB)
The Kettlebell Box Squat is an excellent option for those wanting to perform the box squat with more weight without putting a barbell on their back. You can also use this for circuit training where you perform back-to-back exercises (kb box squat, kb swing, etc.)
- A kettlebell box squat is performed with the kettlebell sphere resting on the forearm & bicep, wrist straight with the upper back squeezed tight and your chest up. Keep the elbows in front of the ribs throughout the whole movement.
Front Box Squat
The front box squat is an excellent selection for those who want to use more quadriceps (front leg muscle) and add variation to traditional front squats.
A front box squat is a front squat performed as a box squat. The barbell will rest on the front of your shoulders with two ways to hold the bar.
- You can hold it with the elbows pointing up in front of you as you bend the wrist holding the bar with the fingertips.
- Another way to hold the bar is to have it resting on the front of the shoulders with the arms crossed (right hand on the left shoulder, left hand on the right shoulder).
As you hold the bar in either front squat position, you will move the feet in a slightly wider than hip-width stance. This exercise will force you to keep the torso upright as the weight in front of you for the movement.
Bodyweight Box Squat
The bodyweight box squat is an excellent exercise for those new to lifting or those that need to learn the technique of box squatting.
The bodyweight box squat is performed with the same technique as a regular box squat but with no additional weight.
Low Box Squat
A low box squat is a box squat. However, instead of sitting on a parallel box, it will be much lower below (2-6 inches). You can use a variety of barbells, dumbbells, or kettlebells with a low box squat, but you may need to reduce the weight used due to the increased range of motion.
High Box Squat
This exercise is a good choice for those limited in mobility or rehabbing from injury. To execute this exercise, a person squats on a box 1 to 8 inches above parallel.
SSB Box Squats
The SSB box squat (also pictured in the low box squat photo and video above) is an excellent choice for athletes as it will allow them to perform the box squat without any discomfort they might feel from a straight bar.
Another benefit of using the SSB box squat is that the SSB can help address a weakness in the upper back due to the camber the SSB has.
Cambered Bar Box Squats
The camber in this bar makes it feel like a straight bar as it sits across the upper back while placing the shoulder joint in a better position.
The hands are positioned much lower to the side of the ribs than a traditional straight bar.
The cambered bar also places the weight plates closer to the center of gravity and forces the athlete to brace his core to avoid the barbell swinging.
Goblet Box Squat
The goblet box squat is an excellent choice for those who have progressed wanting to add weight from the bodyweight squat without placing a bar on the back.
To perform this exercise, you will stand in front of a squat box holding a kettlebell or dumbbell in the palms of your hands at the higher chest level. You will descend to the box from this starting position and ascend without lowering the kettlebell.
Common Mistakes & Corrections
Box squatting correctly is different from free squatting; when mastered, it eliminates nearly all the mistakes that impede progress. This misinterpretation leads to one of the most common mistakes in box squatting, as you must understand how to descend to "sit" on the box. Before we dig into some of the most common mistakes made, I will provide a quick basic recap on how to box squat.
Quick How To Box Squat Correctly Recap
If you are box squatting correctly, the lift begins with hips moving back, like sitting on a chair, rather than breaking at the knees and dropping straight down. As the hips push back horizontally, you will simultaneously start to try to sit down until your glutes contact the top of the box.
Now your goal is to unload only some of the weight into that position. Instead, you will only unload the minimum tension required to relax your hips before you begin the accent.
Bouncing Off/Tap and go squatting
At Westside Barbell HQ, we receive many videos of people requesting advice or input on their exercise techniques. The biggest mistake viewed of all the box squats sent in is of individuals who squat straight down and bounce or tap the box with their glutes instead of sitting back and unloading some force into it.
This incorrect interpretation of box squatting leads to the highest number of lower back injuries. It is one of the primary reasons a box squat gets misjudged as dangerous.
Wrong Box Height
Squatting to a very low or very high box is another common mistake. The goal is to choose a height 1 to 2 inches below parallel. (A parallel squat position is when the hip crease is in line with the knee)
- When to squat low: Any healthy individual can squat to a low box without becoming dangerous. However, make sure that it does not disrupt technique/form. We usually rotate in max effort low box squats, and speed squats 2 to 4 times a year.
- When to squat high: A high box squat is usually done during rehab when the full range of motion is unavailable. Very rarely do our athletes use a high box in training as it does not yield the highest carryover to performance.
Poor Posture
The upper back and shoulders are often rounded at the start of a lift, making the ascent aspect much more complicated and increasing the chance of injury.
To fix this, before unracking, create a solid wedge between your upper back and the bar, pull your head back into alignment and crank your elbows down, as this will help to keep your upper body as vertical as possible. When ascending, look up at the highest comfortable spot possible this will also help maintain good posture.
Knees
On the ascent of a box squat, we often see knees caving inward to execute the movement. To fix this, we usually use the following external or internal cues:
- Knees Out
- Spread the floor
- Open
The cue's goal is to reinforce that you should drive your knees out to the side rather than cave them in, which will significantly reduce the risk of injury and help elicit strength gains.
Lack of control
Keeping control of the movement is hugely important. Refrain from thinking that performing it faster means you are stronger. You should only move as fast as you are technically proficient, or you will create bad habits leading to extensive injuries
How to Program the Box Squat Correctly
Create a sample program for the inclusion of Box Squats if possible
To give you a head start on how to utilize box squats within your training, here are some examples done at Westside Barbell.
Dynamic Effort day is the home to the majority of our box-squat volume. Add accommodating resistance (resistance bands or steel chains) to any of these three-week waves for optimal gains. Remember to change to a new wave every fourth week.
Regular Box Squat Wave
Week 1:
Box Height: 1 inch below parallel
Sets: 12
Reps: 2
% of Bar Weight: 50% of your 1-rep maximal on that lift. If not established, base it on a regular squat max and adjust where necessary. (Make it a priority to attain a 1-rep max in the given lift for accuracy)
% of Accommodating Resistance: 25% of your 1-rep maximal on that lift.
% of Bar Weight with no Accommodating Resistance: 75% of your 1-rep maximal on that lift.
Week 2:
Box Height: 1 inch below parallel
Sets: 12
Reps: 2
% of Bar Weight: 55% of your 1-rep maximal on that lift. If not established, base it on a regular squat max and adjust where necessary. (Make it a priority to attain a 1-rep max in the given lift for accuracy)
% of Accommodating Resistance: 25% of your 1-rep maximal on that lift.
% of Bar Weight with no Accommodating Resistance: 80% of your 1-rep maximal on that lift.
Week 3:
Box Height: 1 inch below parallel
Sets: 10
Reps: 2
% of Bar Weight: 60% of your 1-rep maximal on that lift. If not established, base it on a regular squat max and adjust where necessary. (Make it a priority to attain a 1-rep max in the given lift for accuracy)
% of Accommodating Resistance: 25% of your 1-rep maximal on that lift.
% of Bar Weight with no Accommodating Resistance: 85% of your 1-rep maximal on that lift.
SSB (Safety Squat Bar) Box Squat Wave
Week 1:
Box Height: 2 inches below parallel
Sets: 12
Reps: 2
% of Bar Weight: 50% of your 1-rep maximal on that lift. If not established, base it on a regular squat max and adjust where necessary. (Make it a priority to attain a 1-rep max in the given lift for accuracy)
% of Accommodating Resistance: 25% of your 1-rep maximal on that lift.
% of Bar Weight with no Accommodating Resistance: 75% of your 1-rep maximal on that lift.
Week 2:
Box Height: 2 inches below parallel
Sets: 12
Reps: 2
% of Bar Weight: 55% of your 1-rep maximal on that lift. If not established, base it on a regular squat max and adjust where necessary. (Make it a priority to attain a 1-rep max in the given lift for accuracy)
% of Accommodating Resistance: 25% of your 1-rep maximal on that lift.
% of Bar Weight with no Accommodating Resistance: 80% of your 1-rep maximal on that lift.
Week 3:
Box Height: 2 inches below parallel
Sets: 10
Reps: 2
% of Bar Weight: 60% of your 1-rep maximal on that lift. If not established, base it on a regular squat max and adjust where necessary. (Make it a priority to attain a 1-rep max in the given lift for accuracy)
% of Accommodating Resistance: 25% of your 1-rep maximal on that lift.
% of Bar Weight with no Accommodating Resistance: 85% of your 1-rep maximal on that lift.
Front Squat Wave
Week 1:
Box Height: 1 inch below parallel
Sets: 12
Reps: 2
% of Bar Weight: 50% of your 1-rep maximal on that lift. If not established, base it on a regular squat max and adjust where necessary. (Make it a priority to attain a 1-rep max in the given lift for accuracy)
% of Accommodating Resistance: 25% of your 1-rep maximal on that lift.
% of Bar Weight with no Accommodating Resistance: 75% of your 1-rep maximal on that lift.
Week 2:
Box Height: 1 inch below parallel
Sets: 12
Reps: 2
% of Bar Weight: 55% of your 1-rep maximal on that lift. If not established, base it on a regular squat max and adjust where necessary. (Make it a priority to attain a 1-rep max in the given lift for accuracy)
% of Accommodating Resistance: 25% of your 1-rep maximal on that lift.
% of Bar Weight with no Accommodating Resistance: 80% of your 1-rep maximal on that lift.
Week 3:
Box Height: 1 inch below parallel
Sets: 10
Reps: 2
% of Bar Weight: 60% of your 1-rep maximal on that lift. If not established, base it on a regular squat max and adjust where necessary. (Make it a priority to attain a 1-rep max in the given lift for accuracy)
% of Accommodating Resistance: 25% of your 1-rep maximal on that lift.
% of Bar Weight with no Accommodating Resistance: 85% of your 1-rep maximal on that lift.