Pro Resistance Bands - Full Set (Squat, Bench & Deadlift)
Price
Regular price
$285.00
Regular price
$0.00
Sale price
$285.00
Save
/
*Free Shipping for orders over $100
30 Day Return
Secure payments
6 reviews
In stock, ready to ship
Backordered, shipping soon
Description
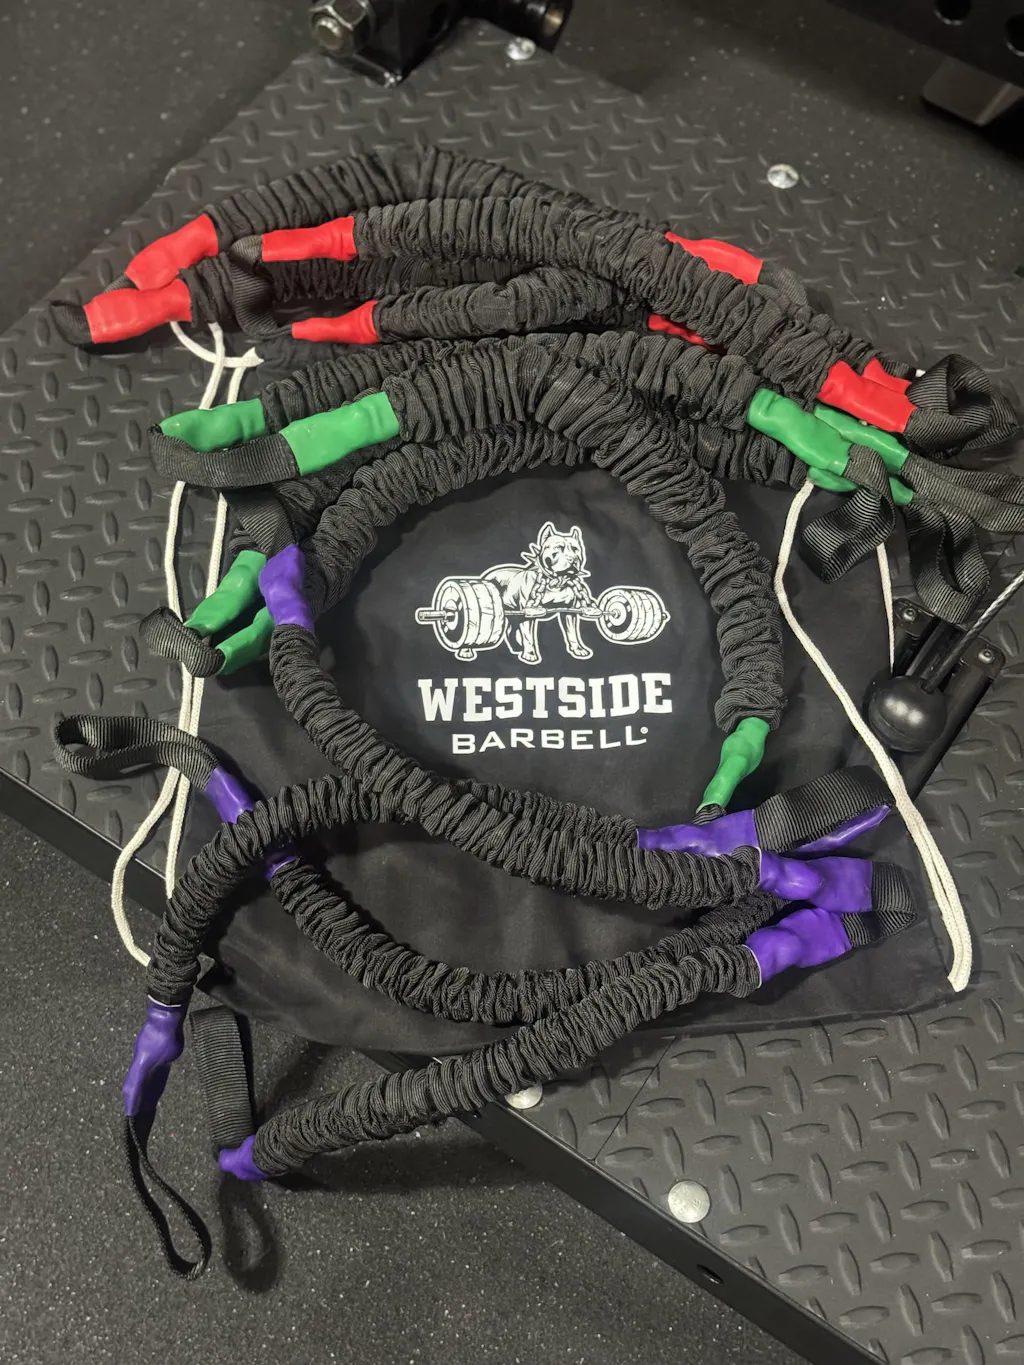
Pro Resistance Bands, Full Set (Squat, Bench & Deadlift)
The full Pro Band lineup in a single purchase: Purple, Green, and Red
Covers speed work, max effort accommodating resistance, and deadlift overload
Fast, repeatable 3-point setup across all three lifts
Balanced left-to-right tension so the bar tracks straight
Engineered for standard power racks and the Rogue Deadlift Platform
Bands only. Anchors, carabiners, and pegs are not included.
6-month no-nonsense replacement
- Made in the USA 🇺🇸 - (Patent Pending)
Overview
The full Pro Band system, every tension we make, in one purchase. Purple for speed and technique work. Green for heavier dynamic effort waves and accommodating resistance on max effort. Red for the deadlift, where you need to overload the lockout without slowing down off the floor.
One setup. Same anchor points every session. No mismatched tension, no guesswork, no drift.
Why Bands Work
Bands add accommodating resistance. The closer you get to lockout, the more tension you have to overcome. That forces force application from start to finish, no coasting through the top of the squat, no slowing down at the chest, no grinding through the lockout of a deadlift.
It is the foundation of dynamic effort training. The full set covers it for every barbell lift.
(1) Pair, Green Bands (Average) — heavier dynamic effort and max effort accommodating resistance on squat and bench
(1) Pair, Red Bands — built for the deadlift, engineered around the Rogue Deadlift Platform peg layout
Band Tension Quick-Reference Table (Westside Setup)
Numbers shown per side and total at the top of the lift. Always measure your exact setup with a luggage scale for programming-level accuracy.
Band
Squat (per side)
Squat (total)
Bench (per side)
Bench (total)
Deadlift (per side)
Deadlift (total)
Purple (Light)
65 lbs
130 lbs
20 lbs
40 lbs
—
—
Green (Average)
85 lbs
170 lbs
50 lbs
100 lbs
—
—
Red (Strong, DL use)
—
—
—
—
80 lbs
160 lbs
Purple + Green (stacked)
150 lbs
300 lbs
70 lbs
140 lbs
—
—
Measure Your Exact Band Tension (Recommended)
Rack height, peg height, peg spacing, and lockout distance all change tension. To dial in your numbers:
Anchor the end loops over your band pegs or secure anchors.
Hook a luggage/fish scale into the middle loop (the loop that sits on the barbell sleeve).
Raise the scale to your lockout height to read tension for your exact setup.
How to Set Up (30 seconds)
Anchor each end loop over your band pegs, one peg per side.
Slide the middle loop over the barbell sleeve, centered.
Match both sides, then lift.
Sample 3-Week Dynamic Effort Wave
Hold band tension constant. Wave bar weight over three weeks. Move every rep with maximum intent.
Squat (Purple or Green): 50% / 55% / 60% bar weight + band tension. 8 to 12 sets of 2.
Bench (Purple or Green): 50% / 55% / 60% bar weight + band tension. 8 to 9 sets of 3.
Deadlift (Red): 50% / 55% / 60% bar weight + band tension. 6 to 8 sets of 1.
Platform & Rack Compatibility
Squat and bench bands work with any power rack that has band pegs or secure attachment points. The Red is built around the Rogue Deadlift Platform peg layout and works with any deadlift platform or floor-anchored peg system with comparable peg-to-bar geometry. If the geometry is different, measure your tension before programming off the listed numbers.
Safety Notes
Secure anchoring only. If you do not have band pegs, use heavy dumbbells, pin/pipe safeties, or other solid anchors.
Progress gradually. Get comfortable controlling overspeed eccentrics before stacking heavier tension.
Inspect bands for damage before every session.
6-Month No-Nonsense Warranty
If the bands snap, we replace them, no runaround.
Every tension we make, in one purchase. Every barbell lift covered.
Everything I have purchased from Westside has been phenomenal and this is no exception! I love their original bands, but these are extra special because of the nylon webbing loops that make it easy to attach and Center the band on the Barbell. Amazing product! If and when I wear these out, I will definitely buy them again!
A
Andrew Schill
Best Bands Ever
I’ve been using bands for dynamic training for years and these are true game changer. Consistent end equal resistance ever time. Much quicker to set-up and quieter. Worth every penny!
J
Joe Rendall
Game changer
These Bands are not like the rest. At first, I thought they looked goofy, but as soon as I attached them to the rack and benched, it was a game changer. Even tension, smooth tension curve, and a simple repeatable set up, makes speed day a breeze. For squats, I'm able to move the anchor points up or down to add or reduce tension. Note-Red bands are for deadlifting only, made that mistake lol! Solid Job guys, will be ordering for our high school weight room next year.
M
Mitch R
Purple and Green are great, Red not so much!
Have been using the bands for about 2 months now and the purple and green and amazing! Love them!! The red ones have different tension and it isn’t close. Very aggravating as it is the heaviest tension bands in the set. I sent an email and got a response from the team that this was unsat and the sent me a new set of Red bands! Love these bands!!
Hi Mitch,
We are sorry to hear about this, and have sent out a repalcement red band set to you.